This post is part of the series Make Noise with Web Audio API and originally appeared on Sonoport Tech Blog.
Welcome to another tutorial on Web Audio API! Today we will showcase a great new library that will take a lot of the nitty gritty of JavaScript and allow us musicians faster access to sound experimentation!
Kyle Stetz, designer and developer for P’unk Avenue in Philadelphia, has created a great library for using key input to play notes on a scale, which he has aptly named Audiokeys. In this post we will walk you through setting up AudioKeys as well as creating a playable custom synth using the diatonic scale. Mr. Stetz is the webaudio wizard who gave us typedrummer, and if you have yet to check it out we highly recommend it.
In this tutorial we will walk you through the setup, and along the way explain a few of the ins and outs of JavaScript. WebAudio is a great tool, but to best harness and make the most of it one must know JavaScript as well.
AudioKeys by Kyle Stetz
So what does AudioKeys help us as with? AudioKeys will help remove the grunt work of assigning keycodes to individual notes, and will also handle webaudio’s use of polyphony and octave jumps for us, similar to a keyboard workstation/MIDI controller. We can now go from playing single sounds using start() stop() to playing like Herbie Hancock without going through much of the grunt work of JavaScript eventhandling. This really frees us up to start doing really interesting and musical experimentation with webaudio right out of the gate. Herbie (probably???) loves JavaScript!
An example of using keyboard input to manipulate webaudio is below
window.onload = function(){
    var audioContext = new AudioContext();

    var attackTime = 0.5;
    var decayTime = 0.2;

    document.addEventListener('keypress', function(e){
        // console.log(e.charCode);
        scheduleEnv(audioContext.currentTime);
    });

    function scheduleEnv(when){
      var osc = audioContext.createOscillator();
      var gain = audioContext.createGain();

      osc.connect(g);
      gain.connect(audioContext.destination);

      osc.frequency.value = Math.random()*100 + 440;

      osc.start();
      gain.gain.value = 0;

      gain.gain.cancelScheduledValues(when);
      gain.gain.setValueAtTime(0, when);
      gain.gain.linearRampToValueAtTime(1, when+attackTime);
      gain.gain.linearRampToValueAtTime(0, when+attackTime+decayTime);
    }
}
The function document.addEventListener listens for user key input which comes in the form of an Event named keypress. Whenever a key is pressed, we call the function scheduleEnv input argument being theaudioContext.currentTime. If this all seems a tad confusing do not worry. This is why we have AudioKeys.
Try it below, click the button and begin typing.
To play with the code, visit Kyle Stetz AudioKeys github repository. There are two ways of downloading a code repository. One is to clone it into a directory you have made, the other is to simply click the Download Zip button. For the purposes of this tutorial we will not dive into the realm of git, github and version control, however feel free to find more information here.
Once you have cloned/downloaded the repository into/onto your machine, please follow the next steps.
Step One
Separate the JavaScript code from the script tags inside of the index.htmlfile and add them to a new JavaScript file named index.js (or another name of your liking!).
- Inside of the folder named /test find the file named
index.html. - Open
index.htmlinside of your code editor and find the<script>tag underneath the two<img>tags. It should appear like this:
    <img id="image1" src="../images/audiokeys-mapping-rows1.jpg" alt="">
    <img id="image2" src="../images/audiokeys-mapping-rows2.jpg" style="display: none" alt="">

<script>- Copy all of the JavaScript code beneath the
<script>tag until the closing</script>tag at the bottom of the page. The bottom should appear like this:
    </script>
  </body>
</html>
Do not include the beginning or ending <script> </script> tags.
- Paste this code into a new empty file and name it
index.js. Put this file a new empty folder and name the folder js.
Step Two
Add a new <script src= to the bottom of the page just before the closing</body> tag and add the index.js file as the source. It should appear like this <script src=../js/index.js></script>
Step Three
Copy and paste the dist folder, images folder, your new js folder, and theindex.html file into a new directory and name it audiokeysJS.
Phew! That's it. Now all you have to do is run a server inside of your root directory named audiokeysJS. NPM has a very usefull command line tool to run a local server.
A look inside the code
Kyle has provided us a great user interface showing us which keys match to which pitch. These are the images we find inside of the index.html file.
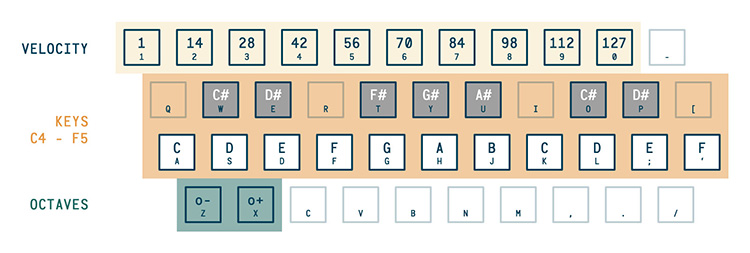
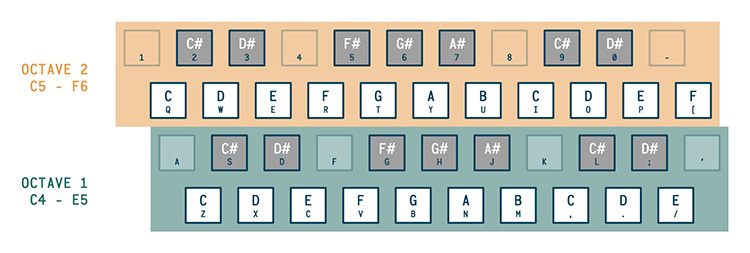
Let's take a look at the JavaScript and webaudio code. We won't look at how AudioKeys works per se, but we will take a look at how easy it is to use AudioKeys to make webaudio more musical.
JavaScript
The code above line 73 var oscillators = {} shows us how to define polyphony, the number of rows we need, and the priority of our polyphony. Priority simply means that we either give precedance to the first note or last note played within our chord. An example would be if we only have 4 note polyphony, and we decide to play a fifth, do we want to hear that fifth note or do we want to give precedance to the notes already being played?
Kyle defines these with the string arguments 'last', 'first', 'lowest', 'highest', i.e. last note played, first note played, lowest note played or highest note played. If this seems confusing right now do not fret, upon playing with the AudioKeys itself your understanding of this concept will become more clear.
The code below line 73 is the core of the webaudio. This is where we will find our oscillator nodes, gain nodes, and we will add a filter node. Below the node connections you will see a function called linearRampToValueAtTime. This is part of the audioparam interface inside of webaudio. Don't worry too much about audioparams for right now, we will discuss them indepth in a future toturial. For now, just know that linearRampToaValueAtTime allows us to perform automation and create envelopes, such as amplitude and filter envelopes.
From here we will tweak a portion of Kyle Stetz' original code. Let's add a filter by adding a BiquadFilterNode.
var filter = context.createBiquadFilter();
Now let's assign it a type of 'lowpass' and give it a value of 250.
filter.type = 'lowpass';
filter.frequency.value = 250;
Next step, let's switch up our connections and get our signal flow correct.
osc.connect(filter);
filter.connect(gain);
gain.connect(context.destination);
Finally, we will replace linearRampToValueAtTime, withexponentialRampToValueAtTime. This ramps up the values exponentially, rather than linearly.
filter.frequency.exponentialRampToValueAtTime(550, context.currentTime + 0.8);
filter.frequency.exponentialRampToValueAtTime(200, context.currentTime + 0.2);
Both linearRampToValueAtTime and exponentialRampToValueAtTime are somewhat self explanitory. They will ramp to a value, the first argument, at a specific time, the second argument. We will talk about how webaudio deals with time in another tutorial. Just know that context.currentTime gives us the current time in webaudio when we call it.
In the above code, we exponentially ramp through the frequency range from 250, our orignaly filter.frequency.value, to 500. The function then ramps the frequency values down to 200, giving us a webaudio filter envelope.
Kyle has already given us an amplitude at the end of his demo.
In all, the JavaScript code should appear as below:
      window.context  = new AudioContext();
      window.keyboard = new AudioKeys({
        polyphony: 1,
        rows: 1,
        priority: 'last'
      });

      var oneRowLayout = true;
      var image1 = document.querySelector('#image1');
      var image2 = document.querySelector('#image2');

      var polyphony = document.querySelector('#polyphony');
      var priority = document.querySelector('#priority');

      document.querySelector('#row-select').addEventListener('change', function(e) {
        oneRowLayout = !oneRowLayout;
        image1.style.display = oneRowLayout ? 'block' : 'none';
        image2.style.display = oneRowLayout ? 'none' : 'block';
        keyboard.set('rows', oneRowLayout ? 1 : 2);
      });

      polyphony.addEventListener('change', function(e) {
        keyboard.set('polyphony', +e.target.value);
      });

      priority.addEventListener('change', function(e) {
        keyboard.set('priority', e.target.value);
      });

      var oscillators = {};

      keyboard.down( function(note) {
        var osc = context.createOscillator();
        var gain = context.createGain();
        var filter = context.createBiquadFilter();

        osc.frequency.value = note.frequency;
        osc.type = 'square';

        filter.type = 'lowpass';
        filter.frequency.value = 250;

        gain.gain.value = 0;

        osc.connect(filter);
        filter.connect(gain);
        gain.connect(context.destination);

        filter.frequency.exponentialRampToValueAtTime(550, context.currentTime + 0.8);
        filter.frequency.exponentialRampToValueAtTime(200, context.currentTime + 0.2);

        gain.gain.linearRampToValueAtTime(0.5, context.currentTime);
        gain.gain.linearRampToValueAtTime(note.velocity / 127, context.currentTime + 0.1);

        osc.start(0);
        oscillators[note.note] = {
          oscillator: osc,
          gain: gain
        };
      });

      keyboard.up( function(note) {
        if(oscillators[note.note]) {
          oscillators[note.note].gain.gain.linearRampToValueAtTime(oscillators[note.note].gain.gain.value, context.currentTime);
          oscillators[note.note].gain.gain.linearRampToValueAtTime(0, context.currentTime + 0.7);
          oscillators[note.note].oscillator.stop(context.currentTime + 0.8);
          delete oscillators[note.note];
        }
      });
Play with the code between lines 192 and 213 to create different tones and envelopes.
The HTML code should appear like below:
<html>
  <head>
    <script src="../dist/audiokeys.js"></script>
    <style>
      img
      {
        width: 100%;
      }
    </style>
  </head>
  <body>

    <label for="rows">Keyboard Layout:</label>
    <select name="rows" id="row-select">
      <option value="1">1 Row</option>
      <option value="2">2 Rows</option>
    </select><br>

    <label for="polyphony">Polyphony:</label>
    <select name="polyphony" id="polyphony">
      <option value="1">1</option>
      <option value="2">2</option>
      <option value="3">3</option>
      <option value="4">4</option>
    </select><br>

    <label for="priority">Priority:</label>
    <select name="priority" id="priority">
      <option value="last">Last</option>
      <option value="first">First</option>
      <option value="lowest">Lowest</option>
      <option value="highest">Highest</option>
    </select>

    <p></p>
    <hr>

    <img id="image1" src="../images/audiokeys-mapping-rows1.jpg" alt="">
    <img id="image2" src="../images/audiokeys-mapping-rows2.jpg" style="display: none" alt="">

    <script src="../js/index.js"></script>

  </body>
</html>
In conclusion, I hope you will find AudioKeys as useful as I have. One of the earliest struggles with webaudio was tying all the JavaScript together in order to make something more musical, something that more closely resembles an instrument. Using keyboard input is a great way to experiment with the many different abilities webaudio has to offer, as well as assisting with learning JavaScript eventlisteners and handlers.
- For more information on AudioKeys and more of Kyle Stetz' developer work please poke around his github page.
- For more information on
linearRampToValueAtTimeand other parts of webaudio, please visit the Mozilla Developer Network as well as the full webaudio spec found here - Please feel free to drop me an email with any feedback/questions.
- Understanding AudioParams: Precision control of web audio nodes - February 7, 2016
- Audio Sampling and the Delay Node with AudioKeys - September 3, 2015
- Prototyping Synth designs using Kyle Stetz’s AudioKeys library - August 28, 2015


