This post is part of the series Make Noise with Web Audio API and originally appeared on Sonoport Tech Blog.
Hey everyone welcome to Part II of Applying Web Audio API with the HTML5 Canvas Element tutorial! We’re going to continue learning on how we can integrate Web Audio API with simple web animations created using the HTML5 Canvas element. If you missed Part I, click here to read it.
Part II: Adding sounds
Finally we get to the part where we can add sounds to our animation! The whole process is not complicated at all, the sounds you’re hearing are randomly generated frequencies (between 100Hz to 1000Hz) that are triggered every time the ball moves beyond the edge of the canvas.
The flow of our audio would be this.
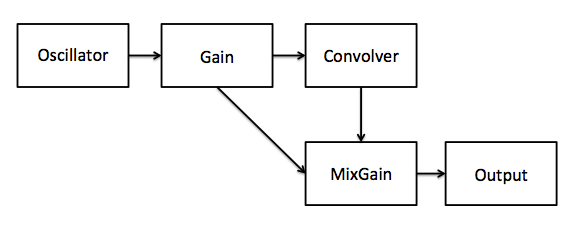
Oscillator & Gain Nodes
Let’s start by creating our audio context.
var context = new AudioContext();
Then we create our oscillator.
var oscillator = context.createOscillator();
oscillator.type = 'sine';
oscillator.start(0);
That was simple wasn’t it? Now its time to create our gain nodes.
var gain = context.createGain();
var mixGain = context.createGain();
gain.gain.value = 0;
For our mixGain we just leave it as it is because the default value for gain nodes is 1. The reason we have two gain nodes is because we would want to have a mixture of dry and wet signal through our output destination.
Convolver Node
However before we start creating our convolver node, we must first understand how reverbs work.
A convolution reverb can be used to simulate an acoustic space. Convolution allows our signal to go through processing based on an impulse response. What is an impulse response? It’s a reaction of a dynamic system in response to an external change.
“Impulse responses can be considered as mathematical models of the system, and affect a given signal similarly as the system would have affect it. So given the impulse responses of the aural spaces we want to recreate(for eg, a hall, church, etc) you could easily convolve that with the audio from the microphone and out comes the audio as if you were speaking in the space.” - Taken from Real-time coustic Room Auralization by Chin Pen.
I also took this gif that explains the math behind convolution from Chine Pen’s website who took it from wikipedia because it’s informative and cool.

So where do we get impulse responses?
Well I took mine from here. It’s all over the internet if you do a quick Google search. There’s different kinds and you can even find impulse reponses from famous cathedrals!
Moving on from that, once we have our impulse responses, we need a place to store them! From our previous tutorial, Tommy wrote:Â “You will need to either store your files on your own web server, or use a cloud storage provider that permits you to use an XMLHttpRequest. You can store them in a GitHub repository, however in this tutorial I will be using Dropbox.”
So that’s what we’re using! Our Dropbox to store our impulse response for our little experiment. Remember to place your impulse response inside your Dropbox public folder.
Once that’s done, it’s time to code!
function getSample(url, cb) {
  var request = new XMLHttpRequest()
  request.open('GET', url)
  request.responseType = 'arraybuffer'
  request.onload = function() {
    context.decodeAudioData(request.response, cb)
  }
  request.send()
}
What we’re doing is simply creating XMLHttpRequest() object by assigning it to a variable and using the methods open() and responseType(). The open() method takes the arguments “GET”, your file URL, and true. We then use the responseType property and assign it the string “arraybuffer”.
You can find more information here.
Next we use the function getSample() to retrieve our file and also add in all the connections!
getSample('https://dl.dropboxusercontent.com/u/30075450/Greek%207%20Echo%20Hall.wav', function(impulse){

var convolver = context.createConvolver() //Create convolver node
var buffer = context.createBufferSource() //Create buffer source
convolver.buffer = impulse //Put the impulse response inside the buffer
One of the properties of a ConvolverNode is the ConvolverNode.buffer which is a mono, stereo, or 4-channel AudioBuffer containing the impulse response used by the ConvolverNode to create the reverb effect.
Moving on from that we can finally add in all the connections!
// Connections

oscillator.connect(gain);
gain.connect(convolver);
convolver.connect(mixGain);
gain.connect(mixGain);
mixGain.connect(context.destination);

});
Now we create the play() and stop() functions!
function play() {
  oscillator.frequency.value = Math.random() * (1000 - 100) + 100;
  gain.gain.value = 0.8;
}

function stop() {
  gain.gain.value = 0;
}
Why am I changing the gain value instead of using OscillatorNode.start() and OscillatorNode.stop() methods?
This is because we can’t call the start and stop methods more than once! I first found out about it because of this article. So a workaround that is to change the values of our gain nodes.
If you’re wondering what is this Math.random() function, it’s basically a random number generation algorithm. You can find it here.
Now since we have our start() and stop() functions, it’s time to integrate this into our <canvas> element!
In our animate() function that we made previously
function animate() {
  ctx.clearRect(0,0, canvas.width, canvas.height);
  ball.draw();
  ball.x += ball.vx;
  ball.y += ball.vy;

  if (ball.y + ball.vy > canvas.height || ball.y + ball.vy < 0) {
  ball.vy = -ball.vy;
  play();
} else {
  stop();
}
if (ball.x + ball.vx > canvas.width || ball.x + ball.vx < 0) {
  ball.vx = -ball.vx;
  play();
}
  raf = window.requestAnimationFrame(animate);
};
What’s happening is that we’re triggering the play() function every time the ball hits the edge of the canvas and if the ball is not touching the edge, the stop() function will mute the sounds.
Now it’s time for you to play with the full code!


